DIY Grooming
How to Groom Your Dog
at Home: Step-by-Step
Home grooming saves money, strengthens your bond with your dog, and keeps the coat in better shape between professional appointments. But technique matters. This guide walks through every step of a complete groom — in the right order, with the right tools — for every major coat type.
10
Steps Covered
5
Coat Types
3–4 wks
Recommended Frequency
1
Setting Up Your Home Grooming Space
The single biggest mistake new home groomers make is trying to groom their dog on the floor. It is uncomfortable for you, gives the dog too much freedom to move, and makes it nearly impossible to maintain control during nail trimming or face work. A non-slip surface at working height is the foundation of a safe home grooming setup.
A grooming table is the ideal solution. Professional-grade grooming tables cost between $80 and $300 and include a non-slip rubber top and often a grooming arm — a post with a loop that goes around the dog's neck to keep it standing in place without restraining it forcefully. If a dedicated grooming table is out of the budget, a sturdy folding table covered with a rubber bath mat works for smaller dogs.
Lighting matters more than most owners expect. You need to see what you're doing — particularly around the ears, paws, and sanitary areas. A moveable desk lamp or clip-on work light positioned above and slightly to the side gives you the visibility you need without casting shadows.
Set up your tools before you bring the dog into the room. Once you have the dog on the table, you want both hands available to manage the animal. Lay out your brushes, combs, shampoo, clippers, scissors, nail clippers, and ear cleaner in the order you'll use them. Have towels ready, and if you're using a velocity dryer, have it plugged in and positioned.
A grooming loop attached to a wall hook, shower rod, or grooming arm keeps the dog's head up and forward, which helps prevent sudden ducking or spinning. The loop should be snug enough to keep the dog's head upright but never tight enough to restrict breathing. Never leave a dog unattended in a grooming loop for any reason.
2
The Correct Grooming Sequence
Professional groomers follow a consistent sequence for good reason: each step prepares the coat for the next one, and doing things out of order creates more work and a worse result. The correct sequence is: pre-brush and de-mat → bath → blow dry → clip or scissor → finish (nails, ears, face, cologne if desired).
Why brush before the bath? Bathing a matted coat causes the mats to tighten and felt as they dry, making them much harder to remove. A thorough pre-brush finds and eliminates tangles before the water touches the coat. Any mat you can't brush out before bathing should be cut out with scissors before the dog enters the tub.
After the bath and thorough blow dry, the coat is in its optimal state for clipping or scissoring: clean, product-free, and fully dry. Clipping a damp coat gives an uneven result and can cause clipper blades to skip and catch. Damp coat also moves differently under scissors, making scissor lines difficult to execute cleanly.
Nails and ears at the end is a deliberate choice. These are often the most stressful parts of grooming for the dog. Doing them last means that if the dog hits its stress threshold during nail trimming, the grooming work is already done. It also means the dog ends the session with the most uncomfortable parts just completed, making treat rewards at the end more effective for conditioning.
3
Understanding Coat Types: What Each One Needs
Short, smooth coats (Beagles, Boxers, Vizslas, Dalmatians) are the lowest-maintenance coat type. These dogs shed continuously but the hairs are short and easy to manage with a rubber grooming glove or a bristle brush used weekly. They rarely mat and don't need clipping. Bathing every four to six weeks is usually sufficient unless the dog rolls in something. A rubber curry comb or grooming mitt during the bath dramatically reduces shedding.
Medium coats (Labrador Retrievers, German Shepherds, Border Collies, Australian Shepherds) are more complex than they appear. These coats often include a dense undercoat that sheds heavily twice a year. During shedding seasons, an undercoat rake or deshedding brush used every few days can remove enormous volumes of loose hair that would otherwise cover your home. These coats don't need trimming but do need regular thorough brushing to prevent the undercoat from compressing against the skin.
Double coats (Siberian Huskies, Samoyeds, Chow Chows, Pomeranians) are a category owners often mismanage. The dense, insulating undercoat must be fully brushed out — not just the surface guard hairs — to prevent the coat from matting against the skin and trapping heat. The correct technique is line brushing (covered in the next section). Double coats should never be shaved — doing so can permanently damage the coat's texture and insulating properties.
Curly and wavy coats (Poodles, Bichons, Portuguese Water Dogs, Doodle crosses) don't shed in the traditional sense, but the dead hair stays in the coat and mats if not removed through brushing. These coats require brushing every two to three days and professional or home clipping every four to eight weeks. Without regular clipping, the coat continues growing indefinitely.
Wiry coats (Wire Fox Terriers, Airedales, Scottish Terriers, Welsh Terriers) are traditionally maintained through hand-stripping — manually pulling dead guard hairs from the coat to encourage new growth. Clipping is easier but softens the coat texture over time. For a pet trim, clipping is perfectly acceptable; for a show dog, hand-stripping is correct.
4
Brushing Technique: The Line Brushing Method
Most owners brush the surface of the coat — the part they can see. Professional groomers brush all the way to the skin, one section at a time. This technique, called line brushing, is essential for any dog with a medium-to-heavy undercoat.
To line brush: part the coat horizontally by holding back a section of hair with one hand. Start at the lowest part of the dog's body and work upward. Brush the exposed section thoroughly, making sure the bristles or pins reach the skin, before releasing the held hair and moving the part line upward by an inch. Continue this pattern until you've worked through the entire coat from bottom to top.
A slicker brush works well for most coat types during line brushing. After brushing each section, run a metal comb through the same area with the teeth pointing toward the skin. If the comb meets resistance, there is still a tangle or undercoat accumulation at the skin level that the brush didn't reach. Return to the brush, then comb again. Only move on when the comb passes through freely.
Never rip through a mat with a brush. This causes pain, damages the coat, and breaks trust. Instead: apply detangler spray, allow it to penetrate for a minute, then work the mat from the ends inward using your fingers or a wide-tooth comb. If a mat is tight enough that it won't yield to gentle working, it's faster and kinder to cut it out with blunt-tipped scissors than to spend ten minutes fighting it.
The belly, armpits, groin, and behind the ears are the highest-priority zones for line brushing in any medium-to-long-coated dog. These areas see the most friction from movement and are almost always the first places to mat in dogs that aren't brushed regularly.
Shop the tools
Starter tools for home grooms
A slicker, nail clippers, and a deshedding rake cover most coat types before you buy specialty gear.
Brush
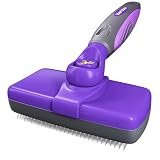
Hertzko Self-Cleaning Slicker Brush
An excellent entry-level brush that's easy to clean. Great for removing loose fur and detangling shorter coats.
Nail Care

Miller's Forge Quality Nail Clipper
Used by professional groomers worldwide. Made of high-quality Italian stainless steel with a heavy-duty spring for clean, sharp cuts.
Brush

Mars Coat King Undercoat Rake
The ultimate tool for double-coated breeds. Strips dead undercoat without damaging the guard hairs.
5
Bathing: Water Temperature, Shampoo Choice, and Rinsing
Use water that is comfortably warm — not hot. A dog's skin is more temperature-sensitive than human skin, and water that feels pleasant on your hand may be too warm for your dog. The right temperature is lukewarm: warmer than cold, cooler than a hot shower.
Wet the coat thoroughly before applying shampoo. Double coats in particular repel water initially; hold the sprayer close to the skin and work the water in with your fingers. The coat must be wet all the way to the skin before shampoo will work effectively.
For shampoo selection: use a dog-specific formulation. Human shampoo has a different pH than dog shampoo and will strip the natural oils from the coat, causing dry, flaky skin. A basic tearless dog shampoo works for routine baths. For heavy shedders, a deshedding shampoo with conditioner helps release undercoat. For white or light-colored coats, a brightening or whitening shampoo enhances coat color. Hypoallergenic shampoos with minimal ingredients are appropriate for dogs with skin sensitivities.
Dilute the shampoo before applying it to the dog. Pour a small amount of shampoo into a cup with several ounces of water and mix. This makes it much easier to distribute evenly through the coat and reduces the amount of product needed — which in turn reduces rinsing time.
Rinsing is where most home groomers cut corners, and it shows in the finished coat. Shampoo residue causes itching, dandruff, and a dull coat. Rinse until the water running off the dog is completely clear, then continue for another thirty seconds. Pay particular attention to the armpits, groin, and the area around the collar, where shampoo accumulates in folds.
Conditioner applied after the shampoo rinse is optional but beneficial for any dog with a medium-to-long coat. It reduces static, eases brushing during blow drying, and adds a healthy shine. Rinse conditioner completely as well.
6
Blow Drying: Velocity Dryers vs Human Dryers
The most common and dangerous home grooming mistake is using a human hair dryer on a dog at high heat. Human dryers are designed to work at temperatures that are safe for human scalp tissue. Dog skin is thinner and far more susceptible to heat damage, and a dog — unlike a person — cannot effectively communicate that it's being burned until serious damage has occurred.
A velocity dryer (also called a high-velocity dryer or force dryer) uses high-speed airflow rather than heat to dry the coat. The force of the air physically blows water out of the coat and simultaneously blows loose undercoat out with it. A velocity dryer will cut drying time for a medium-sized dog from thirty-plus minutes with a human dryer to eight to twelve minutes, while doing zero heat damage.
If you use a human hair dryer, use the lowest heat setting — ideally cool air — and keep it moving constantly. Never hold it in one place for more than a second or two. Keep the dryer at least six inches from the coat surface. Check the skin with your hand frequently to ensure it isn't becoming hot.
Brush the coat continuously while blow drying. The combination of air and a slicker brush or pin brush removes loose hair and straightens the coat simultaneously. For curly-coated dogs (Poodles, Doodles, Bichons), brush-drying while stretching the coat slightly is what produces the straight, fluffy finish that makes scissoring clean lines possible.
The coat must be completely dry before clipping or scissoring. Residual moisture in the undercoat causes clipper blades to drag and skip and makes scissor lines uneven. When you think the coat is dry, run your fingers to the skin in the densest areas — the ruff, shoulders, and saddle. If you feel any coolness or dampness, continue drying.
7
Face and Sanitary Trimming
Face trimming is the highest-risk part of home grooming and should be approached with dedicated blunt-tipped safety scissors. Never use pointed scissors near a dog's eyes, nose, or mouth — a sudden head movement and a pointed tip is a trip to the emergency vet.
For dogs with hair falling over the eyes (Shih Tzus, Old English Sheepdogs, Bearded Collies), trimming the fringe improves the dog's vision and reduces tear staining. Lift the fringe with a comb, position blunt-tip scissors parallel to the dog's face (never pointing inward), and take small cuts. Always have one hand on the dog's muzzle to stabilize the head before scissoring near the eyes.
Beard and mustache hair on terriers and schnauzers should be combed forward and shaped with scissors. The hair in the ear canals (common in Poodles, Schnauzers, and some terriers) can be plucked or trimmed, but only if you've been shown the correct technique — improper ear hair removal causes ear infections.
Sanitary trimming refers to trimming the hair around the dog's private parts and rear end. This is important for hygiene: long hair in these areas traps urine and fecal matter, leading to skin irritation and odor. Use a size 10 clipper blade or blunt-tip scissors. Work carefully, keeping the skin pulled gently taut to reduce the risk of accidentally nicking a fold.
8
Nails: Frequency, Clippers, and Handling the Quick
A dog's nails should be trimmed every three to four weeks for most dogs. You can hear when nails are too long: they click on hard floors. Nails that are too long force the dog's toes to splay sideways with each step, eventually causing pain, altered gait, and in severe cases, skeletal changes in the foot.
Two styles of nail clipper exist for dogs: guillotine-style (a blade that slides across a hole the nail is inserted through) and scissor-style (pliers that cut from both sides). Both work; most professional groomers prefer scissor-style for medium and large dogs because they give more control. Nail grinders are a valid alternative — they remove nail material gradually and leave a smoother edge, but they're slower and many dogs object to the vibration.
The quick is the pink vascular core of the nail that contains blood vessels and nerves. In white or clear nails, it's visible as a pink line inside the nail. In black nails, it's invisible, which makes black-nailed dogs significantly harder to trim at home without catching the quick.
For black nails: trim a very small amount of nail at a time and look at the cut surface after each snip. The nail is hollow and white when you're in the safe zone. As you approach the quick, the center of the cut surface will show a gray or pink dot — stop immediately when you see this. This approach is slower but safe.
If you cut the quick, apply styptic powder immediately and hold it against the nail with gentle pressure for thirty to sixty seconds. The bleeding looks alarming but is rarely serious. Give the dog a treat and a break. If bleeding doesn't stop within five minutes, contact your veterinarian.
Many dogs resist nail trimming because their nails have been cut to the quick in the past. Rebuild trust through counter-conditioning: touch the paw, treat. Press each toe, treat. Hold the clipper near the paw, treat. Cut one nail, several treats. Extend this over multiple sessions across several weeks.
9
Ear Cleaning: Products and How Far to Go
Ear cleaning is part of a complete groom but needs to be done with restraint. The goal is to clean the visible portions of the outer ear canal and the inner surface of the ear flap — not to probe deeply into the ear canal.
Use a veterinarian-approved dog ear cleaning solution. Apply a small amount to a cotton ball (not a cotton-tipped swab) and wipe the visible portions of the ear canal and the inner ear flap. The solution should gently dissolve wax and debris. Allow the dog to shake its head after cleaning to help dislodge loosened material, then wipe with a clean dry cotton ball.
Floppy-eared breeds (Cocker Spaniels, Basset Hounds, Golden Retrievers) and dogs that swim frequently are more prone to ear infections because moisture accumulates in the closed ear canal. These dogs benefit from cleaning after every bath or swim. Dry the inner ear flap and visible canal with a dry cotton ball, and apply a few drops of ear drying solution if your veterinarian recommends it.
Signs that you need a vet rather than ear cleaning: strong or foul odor from the ear, visible discharge (brown, yellow, or black fluid that isn't dry wax), redness or swelling inside the ear canal, the dog shaking its head or scratching at its ears frequently, or obvious pain when you touch the ear. These signs indicate infection or mites — cleaning will not fix them and may make an infection worse.
10
When to Stop and Call a Professional
Home grooming is a genuinely achievable skill for most dog owners, but knowing its limits is as important as knowing the techniques. Certain situations should always go to a professional.
Severe matting: A coat that is matted close to the skin across large areas of the body should go to a professional groomer. Removing these mats requires clippers and a technique that keeps the blade flat against the skin while the groomer carefully works beneath the mat. Attempting this at home without training risks lacerating the skin, which is thinner than it looks and moves easily.
Aggressive or highly anxious dogs: A dog that bites during grooming, that requires a second person to restrain it, or that panics to the point of injuring itself is a dog that a professional groomer or veterinarian with experience handling reactive animals should assess. Ask your vet about anti-anxiety options for grooming visits.
Complex breed-specific trims: Poodle Continental clips, Schnauzer breed trims, Bichon Frise scissoring, and terrier patterns all require considerable training and practice to execute correctly. Watching videos and reading guides is helpful background, but these trims need hands-on time with proper instruction to perform safely and correctly.
Any skin abnormality: Lumps, redness, open sores, hot spots, or unusual odor from the skin should be evaluated by a veterinarian before grooming continues. Grooming over a skin problem can spread infection, cause pain, or delay diagnosis of something that needs treatment.
Shop the tools
Upgrade when you're ready
Pros reach for these when coats get dense or curly — worth it if you groom at home every 3–4 weeks.
Brush

Chris Christensen Big G Slicker Brush
The gold standard for poodles and doodles. Features long pins that penetrate deep into dense coats to remove tangles and fluff the hair.
Tool
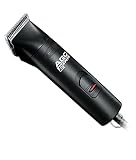
Andis UltraEdge Super 2-Speed Detachable Blade Clipper
Professional grade clippers that stay cool. Perfect for full body grooms and thick coats.
Brush

FURminator Long Hair deShedding Tool for Dogs
The professional-grade deshedding tool that reaches deep beneath the long topcoat to safely remove loose undercoat without cutting or damaging the guard hairs. Reduces shedding up to 90% with regular use. Essential for heavy seasonal shedders like Collies, Golden Retrievers, and Maine Coons.
Explore More
Ready to build your toolkit?
Check out our complete grooming tools buyer's guide, or browse breed-specific guides to learn exactly what your dog's coat type requires.